Dreamy Room Level 426
Level 426 guide walkthrough, helping players solve puzzles and explore the wonderful world of Dreamy Room.
Dreamy Room Level 426 Walkthrough Guide
Dreamy Room Level 426 Room Story
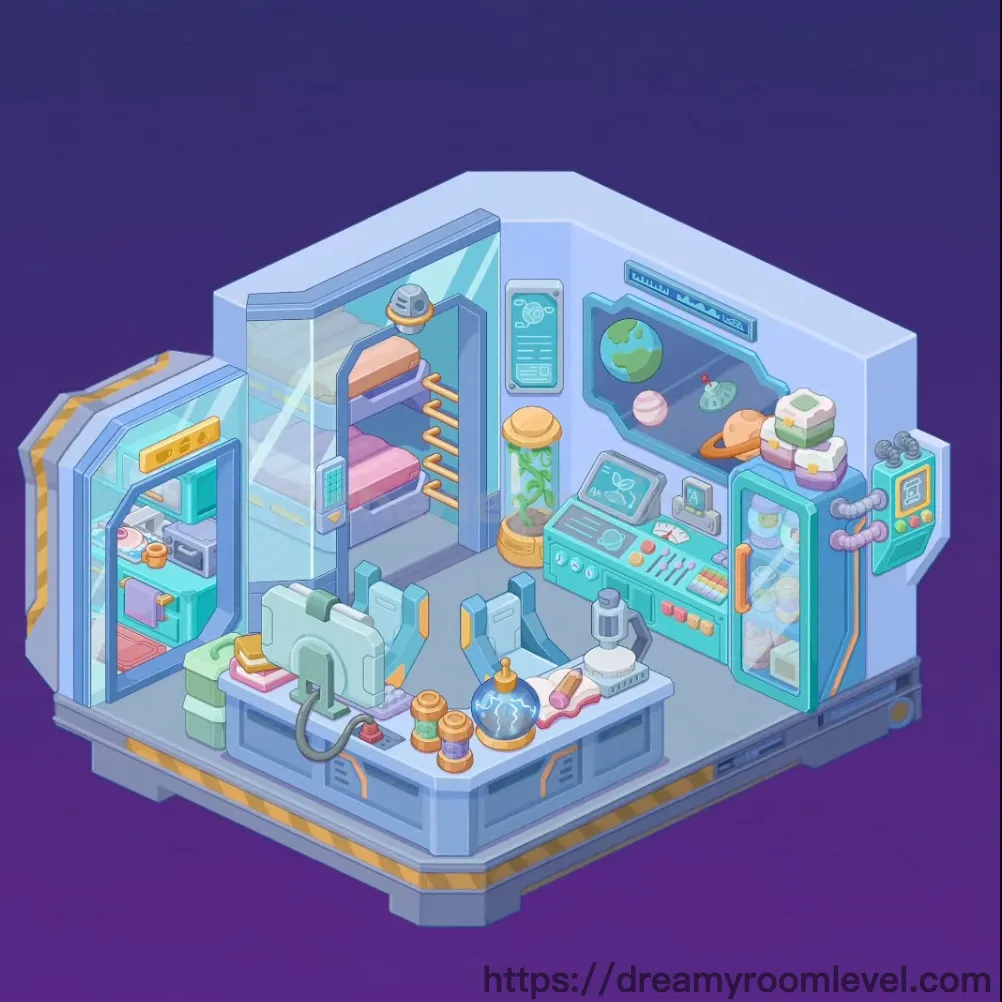
Welcome aboard the cozy Space Station Science Lab in Dreamy Room Level 426! A young astronaut scientist has transformed this compact orbital module into both living quarters and research facility. The bunk bed tucked behind the observation window offers restful sleep with views of Saturn drifting past. By day, the microscope and plasma ball await experiments while colorful planets float across the display screen. Fresh sushi and onigiri fuel late-night research sessions in this Dreamy Room Level 426 cosmic sanctuary.
Dreamy Room Level 426: Step-by-Step Placement Guide
Step 1. Install Space Window Portal in Dreamy Room Level 426
Position the space window portal on the left wall with its large curved frame showing the cosmos outside. Following Dreamy Room Level 426 design principles, this window connects the station to the vast universe.
Step 2. Set Up Bunk Bed Frame
Place the bunk bed frame blue against the left wall beneath the window portal with its sturdy blue metal structure. Add pink mattress upper and pink mattress lower on both bunks. Position pink pillow upper and pink pillow lower at the head of each bed. According to Dreamy Room Level 426 layout requirements, the sleeping area stays cozy.
Step 3. Install Wall Ladder Rungs in Dreamy Room Level 426
Mount wall ladder rung 1, wall ladder rung 2, wall ladder rung 3, and wall ladder rung 4 on the teal wall between the bed and work area. Completing Dreamy Room Level 426 requires these golden ladder rungs for accessing the upper bunk.
Step 4. Add Saturn Planet Decoration
Hang the saturn planet hanging from the ceiling near the bunk bed area with its orange rings clearly visible. Following Dreamy Room Level 426 design principles, this decorative planet adds cosmic charm.
Step 5. Install Teal Storage Cabinet in Dreamy Room Level 426
Position the teal storage cabinet at the far left corner next to the window with multiple shelves. According to Dreamy Room Level 426 layout requirements, this cabinet stores essential supplies.
Step 6. Add Kitchen Appliances to Cabinet
Place microwave oven teal on the middle shelf of the storage cabinet. Add coffee maker white and orange mug on adjacent shelves. Completing Dreamy Room Level 426 requires these daily essentials for station life.
Step 7. Set Up Work Desk Area in Dreamy Room Level 426
Position the work desk gray at the center-front of the room with its gray surface and blue drawers. Place office chair teal in front of the desk. Following Dreamy Room Level 426 design principles, the workstation anchors the lab area.
Step 8. Install Computer Equipment on Desk
Add computer monitor blue on the left side of the desk showing data displays. Place purple keyboard in front of the monitor. Position desk lamp orange nearby for task lighting. According to Dreamy Room Level 426 layout requirements, the computer setup enables research work.
Step 9. Place Scientific Equipment on Desk in Dreamy Room Level 426
Position microscope white on the right side of the desk for specimen analysis. Add plasma ball lightning on the desk showing electric arcs inside the glass sphere. Completing Dreamy Room Level 426 requires these fascinating science tools.
Step 10. Add Specimen Jars and Cables
Place specimen jar orange 1 and specimen jar orange 2 on the desk surface. Add cable wire orange coiled near the equipment. Following Dreamy Room Level 426 design principles, research materials stay organized.
Step 11. Install Planet Display Screen in Dreamy Room Level 426
Mount the planet display screen on the right wall with its curved frame showing the solar system. Add earth globe model, pink planet model, and green moon model floating in front of the display. According to Dreamy Room Level 426 layout requirements, planet models bring astronomy to life.
Step 12. Set Up Control Panel Dashboard
Position control panel dashboard below the planet display with colorful buttons and switches. Add lab tools tweezers and sample slides colorful on the panel surface. Completing Dreamy Room Level 426 requires this operational control center.
Step 13. Install Plant Specimen Tube in Dreamy Room Level 426
Place the plant specimen tube on the right side showing a green plant growing in the tall cylindrical container with bubbling liquid. Following Dreamy Room Level 426 design principles, botanical research thrives aboard the station.
Step 14. Add Butterfly Display and Wall Screens
Mount butterfly display screen showing a butterfly diagram on the back wall. Add satellite diagram panel nearby showing orbital information. Position wall panel screen on the right wall edge. According to Dreamy Room Level 426 layout requirements, educational displays enhance the lab environment.
Step 15. Install Test Equipment and Robot in Dreamy Room Level 426
Place test tube rack on the control panel area. Add robot control device on the far right side of the room. Position purple pipes system along the wall connecting equipment. Completing Dreamy Room Level 426 requires these technical installations.
Step 16. Add Food Items for Station Meals
Place sushi food container 1 and sushi food container 2 on shelves near the control panel. Add onigiri rice ball and sandwich toast nearby. Position bread slices plate and beverage bottle on accessible surfaces. Following Dreamy Room Level 426 design principles, astronauts need tasty meals.
Step 17. Place Personal Items in Dreamy Room Level 426
Add green backpack on the floor near the desk area. Place lunchbox pink and storage box small nearby. According to Dreamy Room Level 426 layout requirements, personal belongings make the station feel like home.
Step 18. Add Star Decorations Outside
Position star decoration 1, star decoration 2, star decoration 3, star decoration 4, star decoration 5, star decoration 6, and star decoration 7 floating in the space outside the station. Completing Dreamy Room Level 426 requires these twinkling stars to complete the Space Station Science Lab!
Tips and Precautions
Precautions
- The bunk bed frame must be placed before adding mattresses and pillows
- Wall ladder rungs are small golden bars that can be easily missed on the teal wall
- Multiple star decorations outside the station may be overlooked in the dark purple space
- Specimen jars and food containers look similar - check positions carefully
- The planet models float in front of the display screen and need precise placement
- Purple pipes along the wall edge can be hard to spot against the equipment
Practical Tips
- Start with large structural elements in Dreamy Room Level 426: window portal, bunk bed, then storage cabinet
- Work from left sleeping area to right science area for logical flow
- Place the work desk before adding all the equipment on top of it
- Group food items together: sushi containers, onigiri, sandwich near each other
- Position wall-mounted screens and panels before placing items in front of them
- Save the floating star decorations for the final step in Dreamy Room Level 426
- The plasma ball's glow helps locate its position on the desk