Dreamy Room Level 518
Level 518 guide walkthrough, helping players solve puzzles and explore the wonderful world of Dreamy Room.
Dreamy Room Level 518 Walkthrough Guide
Dreamy Room Level 518 Room Story
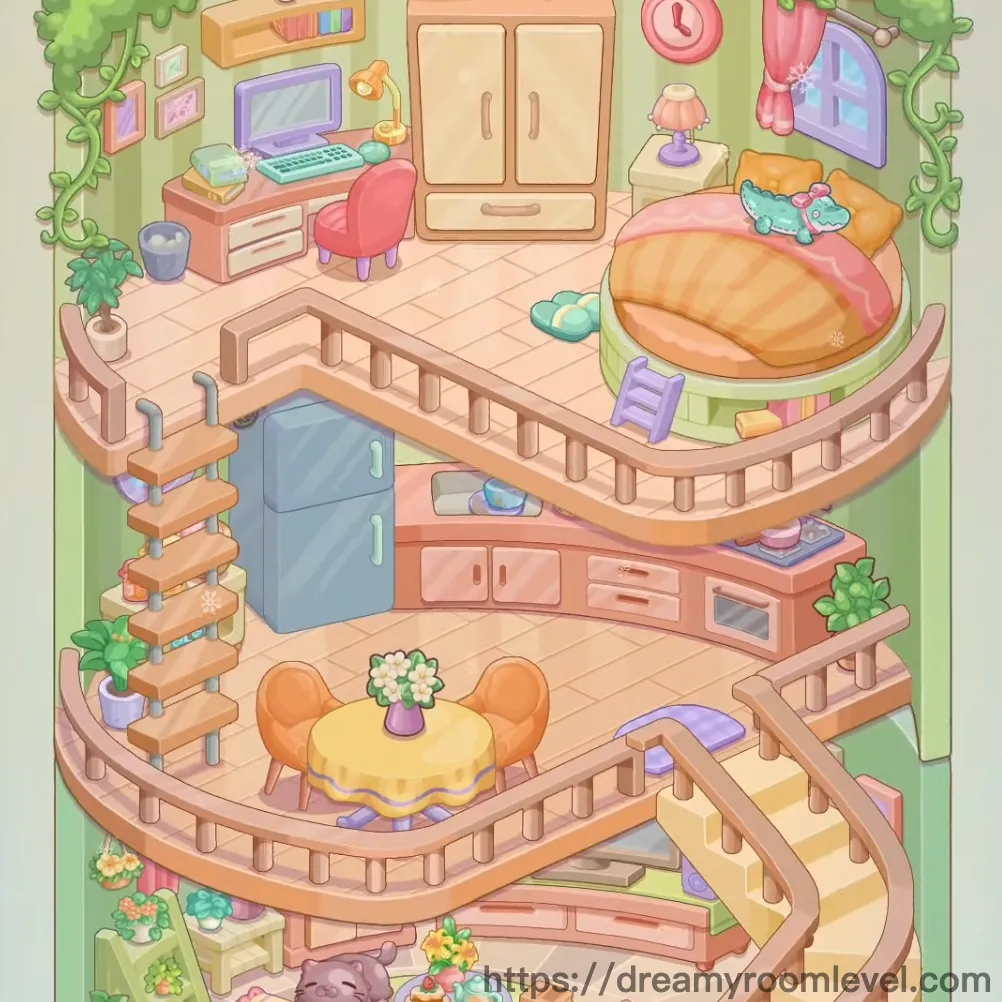
In this charming multi-level home, a creative soul has built their perfect sanctuary. The bottom floor welcomes guests with plush pink sofas and a sleeping cat curled up peacefully. Climbing the wooden stairs reveals a cozy kitchen where morning coffee is brewed, and the top floor holds a dreamy bedroom workspace bathed in soft light. Green vines cascade down the walls, connecting each level with nature's touch. This Dreamy Room Level 518 challenge captures the essence of vertical living, where every floor tells a different chapter of daily life, from relaxation to productivity, all wrapped in pastel warmth and botanical beauty.
Dreamy Room Level 518: Step-by-Step Placement Guide
Step 1. Place Green Vines Along the Walls
Drag the Green Vines to frame the outer edges of the room structure. Position them along both left and right sides, creating a natural border that cascades from top to bottom. The vines should wrap around the circular room perimeter, adding an organic touch to the space.
Step 2. Build the Bottom Floor Living Area Foundation
Place the Pink Sofa Left and Pink Sofa Right on the bottom floor, positioning them symmetrically on either side of the central area. These sofas should face inward toward the center, creating a cozy conversation space in Dreamy Room Level 518.
Step 3. Add the Central Coffee Table
Position the Yellow Round Table in the center between the two pink sofas. Place the Flower Vase on top of the table as the centerpiece. This creates the focal point of the living area following Dreamy Room Level 518 design principles.
Step 4. Arrange Dining Chairs Around the Table
Place the Orange Chair Left and Orange Chair Right on opposite sides of the yellow table. These chairs should be positioned to allow comfortable seating access while maintaining symmetry in the layout.
Step 5. Add the Sleeping Cat and Table Decorations
Drag the Sleeping Cat to rest on the floor near the bottom left area. Place the Snack Plate and Coffee Table Book on or near the yellow table, adding lived-in details to this Dreamy Room Level 518 space.
Step 6. Position Floor Cushions for Extra Seating
Arrange the Floor Cushion Yellow Left, Floor Cushion Yellow Right, and Floor Cushion Purple around the bottom floor perimeter. These cushions provide additional seating and enhance the cozy atmosphere.
Step 7. Add Potted Plants to the Living Area
Place the Potted Plant Left and Potted Plant Right on the bottom floor, positioning them near the outer edges or corners. These plants bring natural elements into the living space, complementing the green vines.
Step 8. Install the Wooden Shelf System
Position the Wooden Shelf Left, Wooden Shelf Middle, and Wooden Shelf Right on the left side of the middle floor. These shelves should stack vertically, creating storage space for kitchen items in Dreamy Room Level 518.
Step 9. Place the Blue Refrigerator
Drag the Blue Refrigerator to the middle floor kitchen area, positioning it near the wooden shelves. The refrigerator should be placed against the wall, easily accessible from the kitchen workspace.
Step 10. Install Kitchen Cabinets and Storage
Position the Kitchen Cabinet Lower and Kitchen Cabinet Upper in the middle floor kitchen area. The upper cabinet should be mounted above the lower one, creating a functional kitchen storage system following Dreamy Room Level 518 layout requirements.
Step 11. Add the Oven and Kitchen Drawer
Place the Oven in the kitchen counter area, typically integrated with the lower cabinets. Position the Kitchen Drawer adjacent to the oven, completing the cooking zone in this level.
Step 12. Set Up the Dining Table Area
Drag the Dining Table to the middle floor, positioning it in the open area near the kitchen. Place the Table Lamp Purple on the table as a centerpiece, providing ambient lighting for meals.
Step 13. Arrange Dining Chairs
Position the Dining Chair Left and Dining Chair Right on opposite sides of the dining table. These chairs should be angled slightly inward for comfortable seating access in Dreamy Room Level 518.
Step 14. Build the Staircase Connection
Place the Staircase connecting the bottom floor to the middle floor, and continuing to the top floor. The stairs should curve naturally along the room's circular structure, creating smooth transitions between levels.
Step 15. Install the Railing System
Drag the Railing along the edges of each floor level, particularly around the staircase openings. The railing provides safety barriers and defines the boundaries of each floor in this Dreamy Room Level 518 challenge.
Step 16. Place the Large Bed on Top Floor
Position the Large Bed on the top floor in the bedroom area. The bed should be placed against the back wall, serving as the focal point of the sleeping space with ample room for movement around it.
Step 17. Add Bed Linens and Accessories
Drape the Pink Blanket over the bed and place the Pillow at the head of the bed. Position the Blue Slippers on the floor beside the bed, adding personal touches to the bedroom.
Step 18. Set Up the Desk Workspace
Place the Desk on the top floor near the window area. Position the Pink Chair in front of the desk, creating a comfortable workspace following Dreamy Room Level 518 design principles.
Step 19. Add Computer and Desk Accessories
Place the Computer on the desk surface, positioning it toward the back. Add the Desk Organizer beside the computer, keeping the workspace tidy and functional in this level.
Step 20. Arrange Books and Photo Frames
Position the Books on Shelf on the wall-mounted shelf above the desk. Place the Photo Frame Left and Photo Frame Right on the wall or shelf, adding personal memories to the space.
Step 21. Install the Wardrobe
Drag the Wardrobe to the top floor bedroom area, positioning it against the wall near the bed. The wardrobe should be easily accessible while not blocking pathways in Dreamy Room Level 518.
Step 22. Add the Pink Clock
Place the Pink Clock on the wall above or near the bed area. The clock should be positioned at eye level for easy viewing, adding both function and decoration to the bedroom.
Step 23. Install the Window
Position the Window on the top floor wall, typically behind or beside the desk area. The window should be placed to allow natural light into the bedroom workspace, completing Dreamy Room Level 518 requirements.
Step 24. Hang the Pink Curtain
Drape the Pink Curtain over the window, allowing it to frame the window opening gracefully. The curtain adds softness and privacy to the bedroom area while matching the room's color scheme.
Step 25. Add Wall Lamp for Lighting
Install the Wall Lamp on the wall near the bed or desk area. The lamp should be positioned to provide task lighting for reading or working, enhancing the functionality of this Dreamy Room Level 518 space.
Step 26. Place Potted Plant on Desk
Position the Potted Plant on Desk on the desk surface, typically near the corner or beside the computer. This small plant brings nature into the workspace and improves air quality.
Step 27. Add the Trash Bin
Place the Trash Bin on the floor near the desk area, positioning it within easy reach but not obstructing walkways. This practical item keeps the bedroom workspace clean and organized.
Step 28. Install the Ceiling Light
Hang the Ceiling Light from the center of the top floor ceiling. The light should be positioned to illuminate the entire bedroom area evenly, providing ambient lighting for Dreamy Room Level 518.
Step 29. Lay the Floor Tiles
Place the Floor Tiles across all floor surfaces, creating the circular patterned flooring visible throughout the multi-level home. The tiles should cover each floor level completely, establishing the foundation of the room.
Step 30. Add Final Green Wall Decoration
Position the Green Wall Decoration on the walls throughout the space, complementing the green vines. These decorative elements tie together the botanical theme running through all levels of this Dreamy Room Level 518 challenge.
Tips and Notes
Important Notes
- The multi-level structure requires careful attention to the staircase placement first, as it determines the flow between floors in Dreamy Room Level 518
- Small items like the sleeping cat and floor cushions can be easily overlooked on the bottom floor due to the furniture arrangement
- The wooden shelf system on the middle floor must be placed before adding kitchen items to avoid placement conflicts
- The railing pieces need to align precisely with floor edges to prevent gaps in the safety barriers
- Window and curtain placement on the top floor should be coordinated to ensure proper alignment and visual appeal
Practical Tips
- Start with the floor tiles and wall decorations to establish the room's foundation before adding furniture in Dreamy Room Level 518
- Place large furniture items (bed, sofas, wardrobe) first, then fill in smaller decorative pieces around them
- Use the circular floor pattern as a guide for symmetrical placement of sofas and cushions on the bottom level
- When arranging the kitchen area, position the refrigerator and cabinets first to define the workspace boundaries
- The desk and chair on the top floor should be placed near the window to maximize natural light for the workspace
- Layer items carefully on each floor level, working from bottom to top to avoid obscuring placement points
- Pay attention to the green vines framing—they should cascade naturally along the outer walls without blocking furniture placement