Dreamy Room Level 487
Level 487 guide walkthrough, helping players solve puzzles and explore the wonderful world of Dreamy Room.
Dreamy Room Level 487 Walkthrough Guide
Dreamy Room Level 487 Room Story
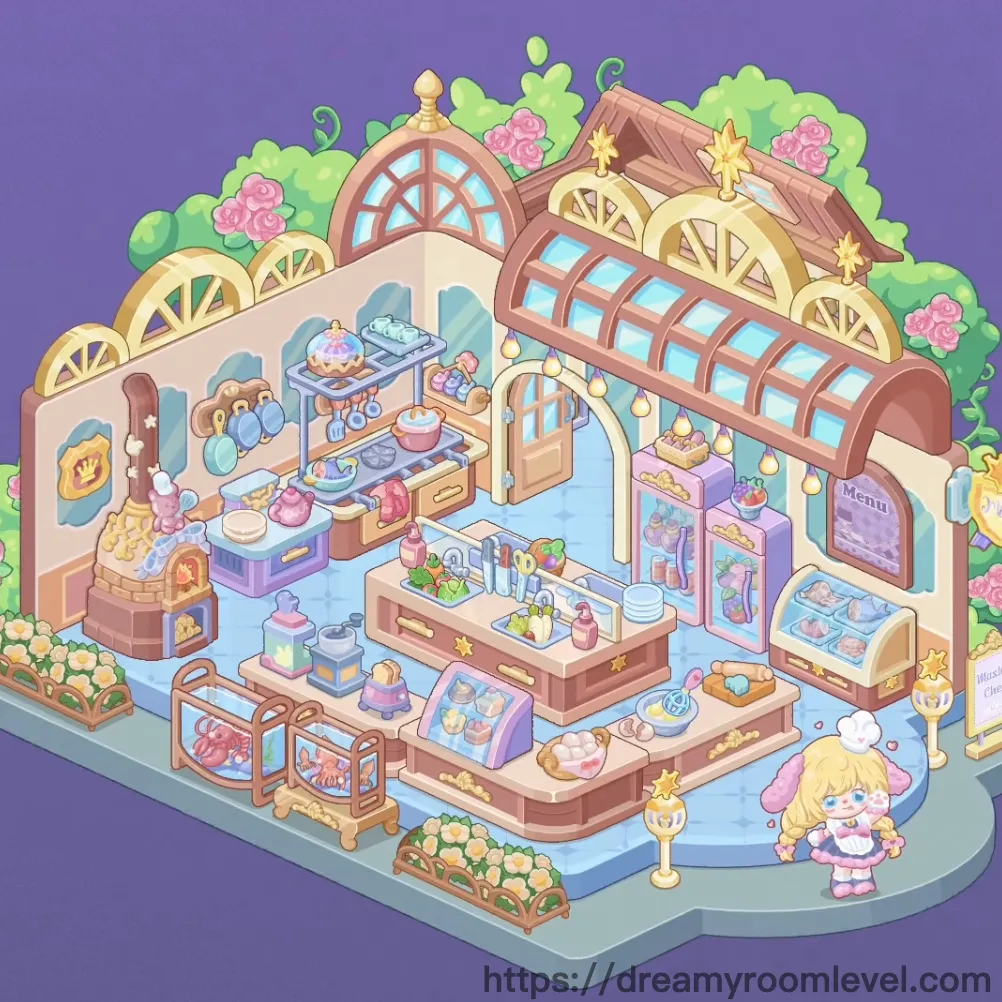
Welcome to Dreamy Room Level 487, a whimsical pastry shop where sweetness fills every corner. The adorable pastry chef girl with her fluffy pink hair runs this charming establishment with passion and creativity. Pink roses climb the walls outside while a beautiful glass roof structure floods the space with warm light. From the stone fireplace oven baking fresh bread to the elegant display cases showcasing colorful treats, this L-shaped bakery is a paradise for dessert lovers. The fish tank bubbles peacefully in one corner while fresh flower arrangements add natural beauty, creating the perfect blend of cozy kitchen and enchanting boutique in Dreamy Room Level 487.
Dreamy Room Level 487 Step-by-Step Placement Guide
Step 1. Install the Pink Striped Wall
Position the pink striped wall along the back corner section of the L-shaped room. Ensure vertical stripes align perfectly at the corner joint for Dreamy Room Level 487's foundation.
Step 2. Place Blue Floor Tiles in Dreamy Room Level 487
Spread blue floor tiles across the entire L-shaped floor area, starting from the back corner. Work systematically to cover all sections including the cutout area.
Step 3. Install the Arched Window
The arched window mounts on the upper left wall section with decorative circular design. Center it precisely for optimal natural lighting in Dreamy Room Level 487.
Step 4. Position the Glass Roof Structure in Dreamy Room Level 487
Place the glass roof structure on the right side, featuring turquoise glass panels. Align it with the wooden roof beams for the conservatory effect.
Step 5. Add Wooden Roof Beams
The wooden roof beams frame the glass roof section with warm brown accents. Position them to create the charming greenhouse atmosphere in Dreamy Room Level 487.
Step 6. Mount the Star Roof Ornament
Place the golden star roof ornament at the peak of the roof structure. Center it perfectly as the shop's crowning decoration for Dreamy Room Level 487.
Step 7. Install the Stone Fireplace Oven in Dreamy Room Level 487
Position the stone fireplace oven against the left wall with its stone archway facing forward. This becomes the heart of the bakery's cooking area.
Step 8. Place the Purple Stove
The purple stove sits adjacent to the fireplace oven on the kitchen counter. Align it for easy access during Dreamy Room Level 487's baking preparations.
Step 9. Add the Pink Cooking Pot
Position the pink cooking pot on top of the purple stove. Center it on the burner for active cooking display in Dreamy Room Level 487.
Step 10. Install Kitchen Shelf Unit in Dreamy Room Level 487
Mount the kitchen shelf unit on the wall above the cooking area. This multi-tiered shelf holds various baking supplies and decorations.
Step 11. Arrange Mixing Bowls
Place mixing bowls on the kitchen shelf and counter areas. Stack them in varying sizes for Dreamy Room Level 487's authentic bakery feel.
Step 12. Position Cake Decorations
The cake decorations display on the upper shelves, showing colorful frosted treats. Arrange them attractively for visual appeal in Dreamy Room Level 487.
Step 13. Install the Dessert Display Case in Dreamy Room Level 487
Place the dessert display case in the front-center area of the shop. This glass case showcases the bakery's finest pastries and cakes.
Step 14. Position the Bread Display Case
The bread display case goes on the right side near the glass roof section. Fill it with fresh bread loaves for Dreamy Room Level 487's product variety.
Step 15. Mount the Menu Board
Install the on the right wall near the display cases. Position it at eye level for customer visibility in Dreamy Room Level 487.
Step 16. String the Hanging Lights in Dreamy Room Level 487
Drape the hanging lights string along the arched doorway and ceiling areas. These warm bulbs create magical ambiance throughout the shop.
Step 17. Place the Arched Doorway
Position the arched doorway between the kitchen and display areas. This elegant arch divides functional zones in Dreamy Room Level 487.
Step 18. Install Kitchen Counter
The kitchen counter runs along the left wall beneath the cooking area. Ensure it provides ample workspace for Dreamy Room Level 487's pastry preparations.
Step 19. Place Wooden Prep Table in Dreamy Room Level 487
Position the wooden prep table in the center kitchen area. This becomes the main food preparation station.
Step 20. Add the Cutting Board
Place the cutting board on the wooden prep table's surface. Angle it for active use display in Dreamy Room Level 487.
Step 21. Arrange Kitchen Utensils
Organize kitchen utensils on the counters and in holders near the prep area. Include whisks, spatulas, and rolling pins for Dreamy Room Level 487's authentic setup.
Step 22. Display Bottles and Jars in Dreamy Room Level 487
Place bottles and jars on shelves and counters throughout the kitchen. These contain syrups, extracts, and decorating supplies.
Step 23. Position the Pink Lantern
The pink lantern hangs or sits in the kitchen area, adding soft pink lighting. Position it for warm accent illumination in Dreamy Room Level 487.
Step 24. Arrange Gift Boxes
Stack gift boxes near the display area for takeaway packaging. Arrange them in various sizes and colors for Dreamy Room Level 487's retail charm.
Step 25. Install the Clothing Rack in Dreamy Room Level 487
Place the clothing rack in the boutique section displaying baking attire. Position it against the wall for easy browsing.
Step 26. Display Aprons
Hang apron display items on the clothing rack. Include various cute designs matching Dreamy Room Level 487's pastel aesthetic.
Step 27. Add Chef Hats
Position chef hats on display near the aprons. These white and decorated hats complete the baker's outfit collection in Dreamy Room Level 487.
Step 28. Organize Baking Tools in Dreamy Room Level 487
Arrange baking tools on the retail shelves for sale display. Include cookie cutters, piping bags, and decorating sets.
Step 29. Fill Display with Cupcakes
Place colorful cupcakes in the dessert display case. Arrange them by frosting color for rainbow effect in Dreamy Room Level 487.
Step 30. Stock Bread Loaves
Position bread loaves in the bread display case. Stack them naturally showing golden crusts for Dreamy Room Level 487's fresh bakery appeal.
Step 31. Display Assorted Pastries in Dreamy Room Level 487
Fill remaining display space with pastries including danishes and croissants. Create abundance throughout the cases.
Step 32. Add Cookie Selections
Arrange in decorative containers on counters. Stack them for easy customer selection in Dreamy Room Level 487.
Step 33. Position Cream Puffs
Place cream puffs prominently in the display case's featured section. Their delicate appearance highlights Dreamy Room Level 487's specialty items.
Step 34. Install the Fish Tank in Dreamy Room Level 487
Position the fish tank in the lower left corner of the room. This glass aquarium adds a peaceful water element to the shop.
Step 35. Add Orange Fish
Place orange fish inside the fish tank, swimming actively. Their bright color complements Dreamy Room Level 487's warm palette.
Step 36. Install Aquarium Decorations
Add aquarium decorations including coral and plants inside the tank. Create an underwater scene for Dreamy Room Level 487's cozy corner.
Step 37. Position the Flower Cart in Dreamy Room Level 487
Place the flower cart in the front right area near the entrance. This wheeled display holds fresh flower arrangements.
Step 38. Arrange White Roses Bouquet
Position the white roses bouquet prominently on the flower cart. These elegant blooms greet customers entering Dreamy Room Level 487.
Step 39. Add Potted Flowers
Place potted flowers around the shop floor and on surfaces. Distribute them for natural beauty throughout Dreamy Room Level 487.
Step 40. Install Golden Trophy Stand in Dreamy Room Level 487
Position the golden trophy stand near the pastry chef character. This decorative piece adds elegance to the entrance area.
Step 41. Place Pink Roses Bushes
Install pink roses bushes along the exterior wall tops and corners. These flowering bushes frame Dreamy Room Level 487's roofline beautifully.
Step 42. Add Green Tree Decorations
Position green tree decorations behind the pink roses on the exterior. Create lush garden backdrop for Dreamy Room Level 487.
Step 43. Install Decorative Molding in Dreamy Room Level 487
Add decorative molding along wall edges and ceiling lines. These golden trim pieces enhance the shop's elegant architecture.
Step 44. Position the Pastry Chef Girl
Finally, place the pastry chef girl in the front right area of the shop. She stands proudly in her pink outfit, welcoming customers to completed Dreamy Room Level 487.
Notes and Tips
Important Notes
- The L-shaped room layout requires careful attention to the corner cutout area
- Glass roof panels must align precisely with wooden beam framework
- Display cases have specific front-facing orientations for proper product visibility
- The fish tank area is separate from food preparation zones for hygiene accuracy
- Multiple layered decorations on exterior walls require back-to-front placement order
Practical Tips
- Start with walls and floor tiles to establish the L-shaped room foundation
- Install large structural elements like the glass roof before adding smaller details
- Use the zoom feature when placing small items in display cases
- Complete the kitchen zone before moving to the retail and flower areas
- Place exterior decorations (roses, trees) last to avoid obstructing your view
- The pastry chef character placement should be saved for final positioning
- Mastering Dreamy Room Level 487 requires patience with the dual-zone layout