Dreamy Room Level 498
Level 498 guide walkthrough, helping players solve puzzles and explore the wonderful world of Dreamy Room.
Dreamy Room Level 498 Walkthrough Guide
Dreamy Room Level 498 Room Story
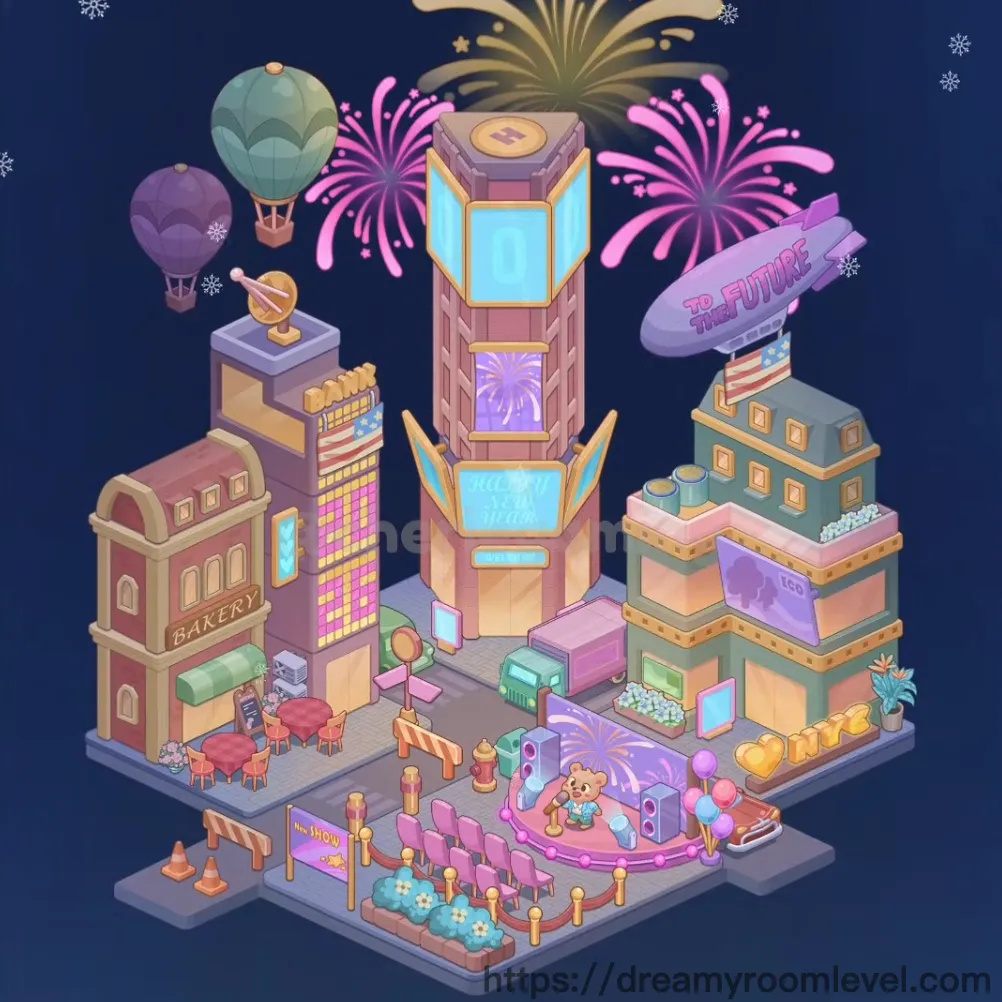
Under the starlit New Year's sky, a magical city square comes alive with celebration. Colorful fireworks burst overhead as hot air balloons drift peacefully above charming buildings. The aroma from the cozy bakery mingles with sweet cotton candy while a cheerful teddy bear entertains crowds on the glowing pink stage. Twinkling lights, festive decorations, and the futuristic blimp overhead create the perfect atmosphere for welcoming the new year in Dreamy Room Level 498.
Dreamy Room Level 498: Step-by-Step Placement Guide
Step 1. Place Street Pavement Base
Position the street pavement base as the foundation covering the entire ground area. This gray platform with decorative patterns serves as the main surface for all other elements in Dreamy Room Level 498.
Step 2. Add Building Base Platforms
Arrange the building base platforms on the left, center, and right sections of the pavement. These elevated platforms will support the main structures and should be aligned precisely to create proper building foundations.
Step 3. Construct Bakery Building Left Side
Place the bakery building left on the far left platform. This charming pink and cream structure with "BAKERY" text should be positioned at the front-left corner, featuring arched windows and doors.
Step 4. Install Green Awning and Rooftop Details on Bakery
Add the awning green bakery above the storefront entrance and place rooftop details bakery on top, including the rounded roof section to complete this cozy shop.
Step 5. Build Purple Tower Center Left in Dreamy Room Level 498
Position the purple tower center left on the center-left platform. This multi-story building features colorful grid windows and architectural details that extend upward prominently.
Step 6. Add Golden Globe Ornament
Place the golden globe ornament on the rooftop of the purple tower. This decorative sphere sits on a display stand and adds an elegant touch to the building's peak.
Step 7. Construct Tall Pink Tower Center
Erect the tall pink tower center as the centerpiece structure. This impressive tower features large blue glass panels, purple firework displays, and gold trim, dominating the skyline in Dreamy Room Level 498.
Step 8. Install Neon Lights on Pink Tower
Attach neon lights pink tower along the building's edges, creating bright blue illuminated panels and decorative lighting strips that enhance the festive atmosphere.
Step 9. Build Teal Building Right Side
Position the teal building right on the right platform. This turquoise and pink structure features multiple window displays and architectural tiers that complement the city square design.
Step 10. Add Rooftop Details to Teal Building
Place rooftop details teal building including white decorative elements and the rooftop garden section to complete this building's charming appearance.
Step 11. Position Window Displays Across All Buildings in Dreamy Room Level 498
Install window displays bakery, window displays purple tower, window displays pink tower, and window displays teal building on each structure to show illuminated interiors and storefronts.
Step 12. Add Decorative Gold Trim to Buildings
Apply decorative gold trim buildings along the edges and corners of the main towers, creating elegant golden borders that enhance the architectural beauty.
Step 13. Place Pink Stage Platform
Position the pink stage platform in the front-center area. This curved, glowing pink performance stage features purple decorative panels and serves as the entertainment focal point.
Step 14. Add Teddy Bear on Stage
Place the teddy bear on stage in the center of the pink platform. This adorable blue-dressed performer becomes the star attraction of the celebration.
Step 15. Arrange Pink Bench and Purple Chairs in Dreamy Room Level 498
Set the pink bench near the stage area, and position purple chairs left in rows facing the performance area for audience seating.
Step 16. Install Neon Show Sign
Place the neon show sign at the front edge of the stage area. This yellow illuminated sign with "SHOW" text announces the entertainment to passersby.
Step 17. Set Up Red Table and Pink Chairs at Bakery
Arrange the red table left outside the bakery with pink chairs left around it, creating an outdoor dining area perfect for enjoying treats.
Step 18. Add Cotton Candy Stand
Position the cotton candy stand on the right side near the stage. This colorful carnival treat station features a striped pole and fluffy pink cotton candy display.
Step 19. Place Heart Balloons and Ice Cream Cone Sign in Dreamy Room Level 498
Add heart balloons floating near the cotton candy stand and install the ice cream cone sign nearby to create a festive carnival atmosphere.
Step 20. Position Teal Car
Place the teal car on the street in front of the pink tower. This mint-green vehicle should be parked at an angle, adding urban realism to the scene.
Step 21. Install Street Lamp and Traffic Light Pole
Add the street lamp between buildings and position the traffic light pole near the intersection area to provide proper street lighting and traffic control.
Step 22. Place Fire Hydrant
Position the fire hydrant on the sidewalk near the street corner. This red safety equipment should be visible and accessible along the pavement.
Step 23. Add Orange Traffic Cones and Yellow Bollards in Dreamy Room Level 498
Scatter orange traffic cones near the stage area and place yellow bollards along the stage perimeter to create crowd control barriers.
Step 24. Install Parking Barrier Striped
Add the parking barrier striped near the parking area. This orange and white striped barrier helps define restricted zones.
Step 25. Position Teddy Bear Statue
Place the teddy bear statue on the sidewalk near the purple tower as a decorative landmark that adds whimsy to the street scene.
Step 26. Add Flower Planters White and Blue
Arrange flower planters white with white blooms and flower planters blue with blue flowers along the sidewalk and stage edges to add natural beauty.
Step 27. Place Sidewalk Tiles in Dreamy Room Level 498
Install sidewalk tiles sections around buildings and walkways, creating defined pedestrian paths throughout the square.
Step 28. Position Teal Hot Air Balloon
Float the teal hot air balloon in the upper-left sky area. This mint-green balloon with basket should appear to drift gracefully above the cityscape.
Step 29. Add Purple Hot Air Balloon
Place the purple hot air balloon slightly below and left of the teal balloon, creating a layered floating effect in the sky.
Step 30. Install To The Future Blimp
Position the to the future blimp in the upper-right sky area. This purple airship with "TO THE FUTURE" text should float majestically above the teal building.
Step 31. Add Pink Firework Left in Dreamy Room Level 498
Place the pink firework left in the upper-left sky area. This vibrant magenta burst with trailing sparkles creates the first explosion effect.
Step 32. Position Pink Firework Right
Add the pink firework right in the upper-right area, mirroring the left firework to create symmetrical celebration bursts above the buildings.
Step 33. Install Gold Firework Center
Place the gold firework center at the top-center of the sky. This golden explosion serves as the crowning centerpiece of the fireworks display.
Step 34. Scatter Snowflakes Throughout Sky in Dreamy Room Level 498
Add snowflake top left, snowflake top right 1, snowflake top right 2, snowflake center right, snowflake left side, and snowflake bottom right across the sky to create a gentle winter snowfall effect.
Step 35. Add Final Neon Lights Purple Tower
Install neon lights purple tower on the center-left building, completing the illuminated grid pattern that makes the structure glow brilliantly.
Tips and Tricks
Important Notes
- The tall pink tower in the center requires precise vertical alignment - ensure the blue glass panels are perfectly stacked before adding surrounding elements to avoid obstruction issues in Dreamy Room Level 498.
- Small decorative elements like snowflakes and flower planters can easily be missed - carefully check all corners and edges of the scene for hidden placement spots.
- The purple stage panel on the pink platform has a specific orientation - drag it from the correct angle to align properly with the curved stage edge.
- Traffic cones and bollards must be placed after the stage platform to prevent them from being hidden underneath larger structures.
- Window displays should be added before gold trim details to ensure proper layering on building facades.
Practical Tips
- When placing hot air balloons, start from the back layer (teal) and work forward (purple) to achieve proper depth perception in the sky.
- For the teal car placement, approach the parking spot from the lower-right corner and drag diagonally upward to trigger the snap-to position mechanism.
- The teddy bear on stage has a small placement zone - aim for the exact center of the pink platform and release when you feel the magnetic pull.
- Fireworks should be placed in order from outer edges inward - this prevents overlapping issues and maintains the visual burst effect properly in Dreamy Room Level 498.
- When arranging multiple similar items like chairs or bollards, place them in a sweeping motion along the intended line rather than individually for faster completion.
- Building placement works best when you start with base platforms, then add main structures, and finally apply decorative details like neon lights and trim last.