Dreamy Room Level 501
Level 501 guide walkthrough, helping players solve puzzles and explore the wonderful world of Dreamy Room.
Dreamy Room Level 501 Walkthrough Guide
Dreamy Room Level 501 Room Story
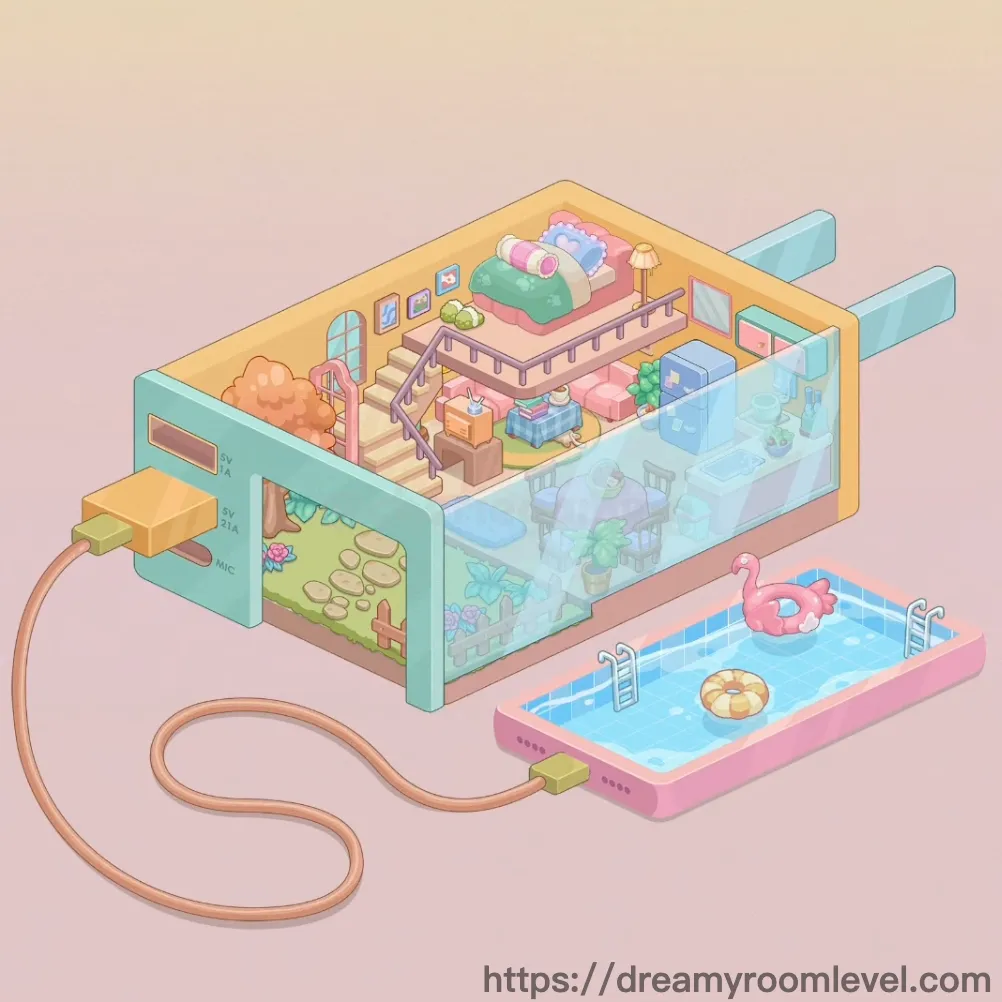
Inside a whimsical game console lives a magical miniature world where imagination comes alive. The upper floor houses a cozy bedroom with colorful pillows beneath a golden roof, while the middle level features charming furniture overlooking a stunning aquarium filled with vibrant sea creatures. Outside, a sparkling swimming pool with playful floats awaits summer fun. This is Dreamy Room Level 501, where technology meets fantasy in a nostalgic tribute to childhood gaming memories and dreamy living spaces.
Dreamy Room Level 501: Step-by-Step Placement Guide
Step 1. Install Yellow Roof Structure
Position the yellow roof covering the entire top section of the game console house. This curved golden ceiling creates the upper bedroom enclosure in Dreamy Room Level 501.
Step 2. Build Bedroom Base and Ceiling Beam
Construct the upper floor platform with proper support. Install the ceiling beam running horizontally beneath the yellow roof to provide structural stability.
Step 3. Place Bed Frame and Green Mattress
Position the bed frame in the center of the upper bedroom area against the back wall. Place the green mattress on top of the frame to create a comfortable sleeping surface.
Step 4. Arrange Pillows on Bed in Dreamy Room Level 501
Add the pink pillow, blue pillow, and white pillow arranged neatly on the green mattress from left to right for a cozy bedroom setup.
Step 5. Add Table Lamp and Picture Frames
Place the table lamp on the bedside area providing warm lighting. Mount the picture frame left, picture frame center, and picture frame right on the wall above the bed.
Step 6. Install Windows in Upper Bedroom
Position the window arched on the left wall with its curved top design. Place the window rectangular on the right side wall allowing natural light into the space in Dreamy Room Level 501.
Step 7. Build Staircase Connection
Install the staircase steps descending from the bedroom to the middle floor level. Add the staircase railing along the right side for safety and decorative detail.
Step 8. Lay Upper Floor Tiles
Cover the bedroom floor with upper floor tiles in a striped beige pattern, creating a warm walking surface that extends to the stairway edge.
Step 9. Position Pink and Blue Chairs in Dreamy Room Level 501
Place the pink chair on the middle floor's left side facing toward the aquarium. Position the blue chair on the right side creating a symmetrical seating arrangement.
Step 10. Add Storage Box and Shelf Unit
Set the brown storage box on the middle floor near the stairs for organizing items. Install the shelf unit against the wall for additional storage space.
Step 11. Place Potted Plant Decoration
Position the potted plant with lush green foliage on the middle floor area, adding natural beauty and freshness to the living space in Dreamy Room Level 501.
Step 12. Construct Aquarium Glass Wall
Install the aquarium glass wall creating the transparent enclosure on the right side of the console. This clear barrier allows viewing of the underwater world inside.
Step 13. Fill Aquarium with Water
Pour the aquarium water into the glass enclosure, filling it with blue transparent liquid that creates the underwater environment for sea creatures.
Step 14. Add Fish and Starfish in Dreamy Room Level 501
Place the orange fish and blue fish swimming at different depths in the aquarium water. Add the starfish attached to the glass or resting on the bottom.
Step 15. Plant Seaweed and Coral
Position the tall seaweed growing from the aquarium floor reaching upward. Place the short seaweed in clusters and add coral decoration for underwater scenery.
Step 16. Arrange Aquarium Rocks and Bubbles
Scatter aquarium rocks along the bottom of the tank creating a natural seabed. Add air bubbles rising from the rocks and decorations toward the water surface.
Step 17. Install Aquarium Base Platform
Position the aquarium base platform beneath the glass tank, providing structural support and completing the aquarium setup in Dreamy Room Level 501.
Step 18. Build Teal Console Shell Exterior
Construct the teal console shell forming the outer casing of the game console house. This turquoise exterior wraps around the living spaces creating the device shape.
Step 19. Install Display Screen and Images
Mount the display screen on the left exterior wall of the console showing a nature scene. Add the mushroom screen, flower screen, footprint path, and vine decoration elements visible on the display.
Step 20. Add Grass Patch to Screen Display
Place the grass patch at the bottom of the display screen, creating a green meadow scene that gives the console a playful retro gaming aesthetic in Dreamy Room Level 501.
Step 21. Attach Cable Wire and Yellow Plug
Connect the cable wire extending from the left side of the console, creating a realistic power connection. Attach the yellow plug at the cable's end in classic retro style.
Step 22. Add MIC Label and Console Buttons
Apply the mic label marking on the front panel of the console casing. Add and console ventilation holes on the shell exterior.
Step 23. Build Swimming Pool Structure
Construct the pool base beside the console. Install the pink pool border creating the raised edge around the swimming area in Dreamy Room Level 501.
Step 24. Fill Pool with Water
Pour the pool water into the pool enclosure, filling it with clear blue water that creates a refreshing swimming environment.
Step 25. Add Flamingo Float and Swimming Ring
Float the flamingo float on the pool water surface with its pink body and blue center. Add the yellow swimming ring floating nearby for playful pool fun.
Step 26. Install Pool Ladder and Floor Tiles
Attach the pool ladder to the pool's edge allowing easy entry and exit from the water. Lay pool floor tiles in a blue checkered pattern at the bottom.
Step 27. Add Orange Tree Decoration in Dreamy Room Level 501
Place the orange tree left on the exterior left side of the console near the display screen, adding a natural decorative element to the setup.
Step 28. Position Wall Decoration Panel
Install the wall decoration panel on interior walls throughout the console house, adding colorful accents and completing the cozy atmosphere in Dreamy Room Level 501.
Tips and Tricks
Important Notes
- The yellow roof must be placed first before bedroom furniture to avoid obstruction issues when arranging the bed and pillows in Dreamy Room Level 501
- The aquarium glass wall requires precise positioning before adding water and sea creatures, otherwise fish may appear outside the tank boundaries
- Pillows on the bed have a specific left-to-right color arrangement that must be followed for proper completion
- The display screen elements on the console exterior are small and easily missed, carefully check all decorative details are placed
- The pool ladder has a specific attachment point on the pool border that requires accurate alignment to snap into position
Practical Tips
- Start construction from the top floor downward to the pool area, maintaining proper layering throughout Dreamy Room Level 501
- When placing aquarium decorations, add rocks and seaweed before fish to create natural hiding spots and swimming paths
- The cable wire has a curved shape that flows naturally, position it starting from the console connection point and let it drape downward
- For the staircase, align the railing first as a guide, then place steps one by one to ensure even spacing
- Arrange the three picture frames above the bed in a horizontal line at the same height for balanced wall decoration
- The swimming pool floats should be positioned with slight rotation to appear naturally floating rather than rigidly aligned in Dreamy Room Level 501