Dreamy Room Level 580
Level 580 guide walkthrough, helping players solve puzzles and explore the wonderful world of Dreamy Room.
Dreamy Room Level 580 Walkthrough Guide
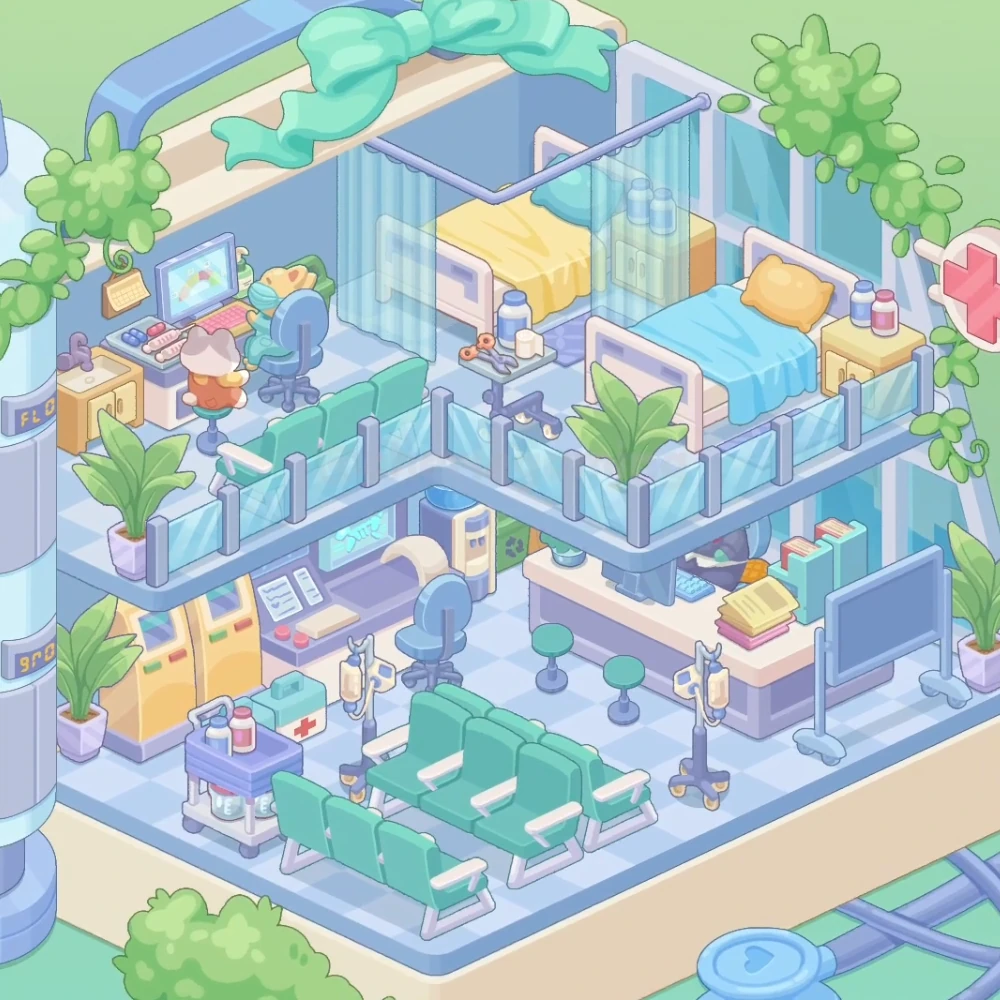
Dreamy Room Level 580 is a blue, two-story animal clinic. The upper floor holds the beds and dental area, while the lower floor combines reception, medical equipment, and green waiting seats. Left and right below follow the image as viewed.
Step 1. Arrange the two upstairs beds
Put the yellow hospital bed at the back of the upper floor, with its turquoise pillow against the rear wall. Its foot points toward the open center of the room.
The blue hospital bed goes to its right and closer to the viewer. The yellow pillow rests at the back-right end, and the pale footboard faces diagonally left. Place the bedside cabinets and bottles alongside the beds: the blue bed has a yellow cabinet on its right with two colored bottles on top.
Step 2. Fit the curtains and bedside trolley
Hang the translucent aqua privacy curtains from the overhead rails around the yellow bed. Their lower edges reach the upper floor; the blue bed remains visible in front of the right-hand curtain.
Place the bedside instrument trolley in the gap between the dental area and the beds, just left of the blue bed's footboard. Its upper tray carries a large bottle, a small white container, and the visible instruments.
Step 3. Build the dental corner at the upper left
Set the dental workstation against the upper floor's left wall. The small yellow sink cabinet belongs at its far-left end; the screen, keyboard, and tooth model sit on the adjoining work surface.
Position the dental chair and blue stool in front of the screen, with the blue seat back toward the viewer. The orange-clad cat sits on the separate small stool to the workstation's front-left, facing the dental equipment.
Step 4. Complete the upper balcony
Run the upstairs waiting bench along the open front of the dental area. Its green back separates the treatment corner from the balcony edge.
Fit the glass balcony railings along the upper floor's exposed front and right edges. Follow the floor's corner below the blue bed, keeping the glass panels between the gray posts.
Step 5. Place the lower-floor machines
Put the pair of yellow self-service kiosks along the downstairs left wall, beneath the upper dental area. Their slanted screens face into the waiting room.
The lower medical workstation sits immediately to their right, against the back wall. Its small screens and curved pale equipment surround belong behind the blue swivel chair. Place the tall water dispenser beside this workstation, close to the rear corner beneath the balcony.
Step 6. Set up reception on the right
Place the long cream-topped reception desk across the lower floor's back-right area. The counter faces the waiting seats and ends beside the freestanding blue screen.
Arrange the desk computer and files on top: the monitor and keyboard occupy the middle-left, while the upright turquoise file holders and stacked folders fill the right end. The small plant sits at the opposite end. Position the reception cat behind the monitor, partly hidden by the desk equipment.
Step 7. Add the reception stools and screen
Put the two round visitor stools in front of the reception counter. Their green circular seats line up along the visitor side of the desk.
Stand the large blue wheeled screen to the counter's right, near the lower floor's outer edge. Its broad rectangular face points toward the seating area, and its two wheeled feet remain on the downstairs tiles.
Step 8. Align the waiting seats
Arrange the green waiting seats in the center-front of the ground floor. The connected rows run diagonally across the tiled space, with their padded green backs forming parallel lines.
Use the white armrests and silver bases to line up each section. Keep the reception stools behind the seating block and the medicine cart to its left.
Step 9. Position the medical stands and cart
Place the two IV stands on opposite sides of the central seats: one between the seats and the yellow kiosks, and the other between the seats and the reception screen. Each stand has hanging bags and a wheeled base.
Set the purple medicine cart and first aid case to the left of the waiting rows. The cart carries bottles on its upper tray and containers below. The mint first aid case with a red cross sits behind it, nearer the kiosks.
Step 10. Finish the plants and clinic exterior
Distribute the potted plants around the open corners: two flank the upstairs balcony, and two stand near the outer edges downstairs. The broad leaves rise above pale square pots.
Place the large mint roof bow and vines along the roofline. The bow stretches across the top, while the leafy growth follows the upper corners and right exterior. Attach the red medical cross sign to the upper-right outside wall beside the blue bed.
Final placement check
The yellow bed is farther back than the blue bed. The dental equipment stays upstairs on the left; the yellow kiosks stay downstairs beneath it. The reception desk occupies the lower right, with the green waiting rows in front and an IV stand on either side of the seating area.