Dreamy Room Level 590
Level 590 guide walkthrough, helping players solve puzzles and explore the wonderful world of Dreamy Room.
Dreamy Room Level 590 Walkthrough Guide
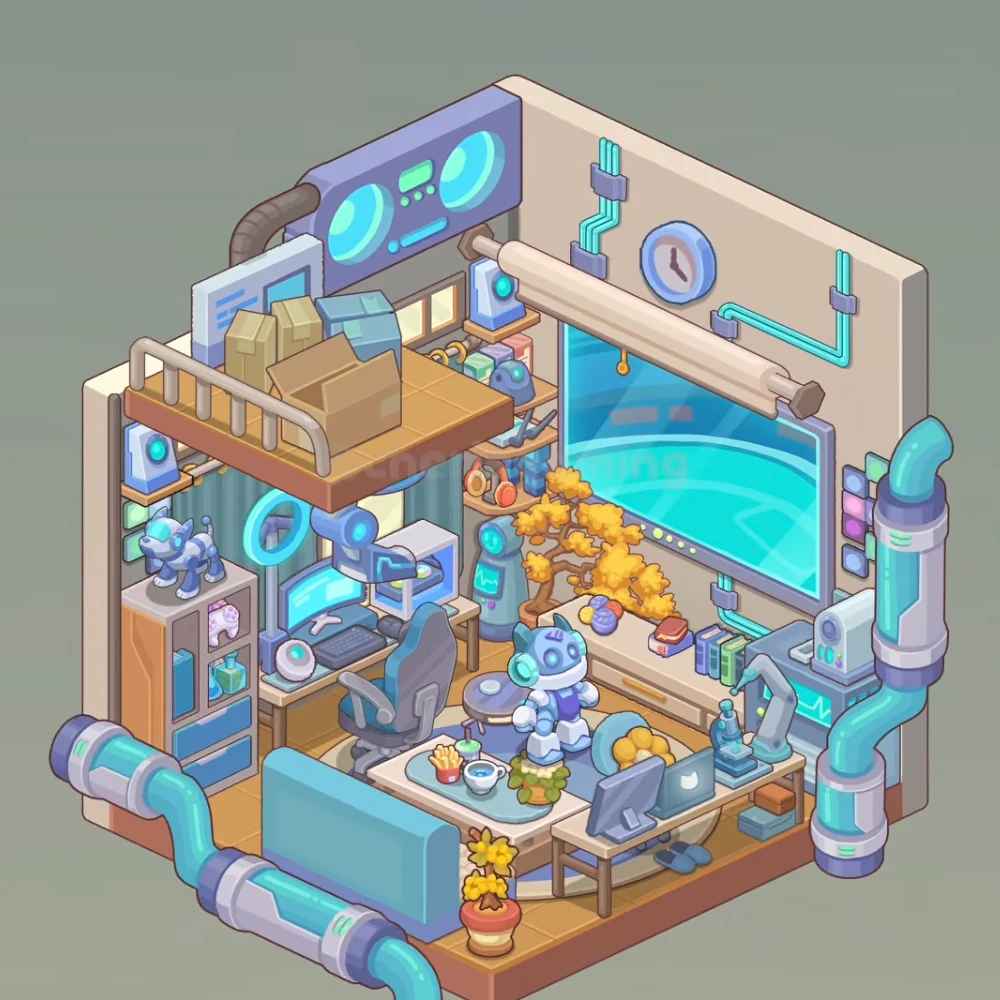
Dreamy Room Level 590 combines a robot workshop with a small lounge. A computer station sits beneath the left storage loft, a giant cyan display covers the back wall, and a second workbench runs along the right. Directions below follow the image as viewed.
Step 1. Fit the main wall display
Place the large cyan wall display across the back-right wall. Its broad blue-green screen sits above the low cream storage unit, with the small indicator lights along the bottom frame.
Position the wall clock and cyan cable runs above and around the display. The blue clock hangs near the wall's center. Short turquoise lines run vertically to its left, while a longer bent section follows the upper-right wall.
Step 2. Add the upper storage loft
Fit the storage loft and pale railing across the room's upper-left side. The orange-brown platform projects over the computer station, with the railing along its open front-left edge.
Arrange the cardboard boxes blue crate and board on top. The open brown box sits near the railing, closed parcels stand behind it, and the blue container and large leaning board occupy the rear.
Step 3. Position the wall audio unit and shelf devices
Mount the large wall audio unit high on the left wall, behind the loft. Its two bright cyan circular speakers flank the small green display and buttons. The dark curved duct runs behind its left edge.
Set the small blue devices and shelf headphones on the narrow wall shelves. A blue-lit unit sits at the loft's far-left side; another stands high near the corner above the small robot-shaped device. The orange headphones hang on the shelf below, beside the books.
Step 4. Assemble the left computer desk
Put the computer monitor keyboard and tower on the desk beneath the loft. The wide cyan monitor faces into the room, the keyboard lies in front, and the pale computer tower stands at the right end.
Place the round desk speaker and wrench on this workstation. The round white-and-cyan speaker sits on the left edge, and the pale wrench rests near the monitor above the keyboard.
Step 5. Add the workstation arm and chair
Fit the overhead robotic arm and ring light beneath the loft. The bulky blue arm hangs over the monitor, while the glowing cyan ring stands farther left against the wall.
Place the gray office chair directly in front of the computer desk. Its tall back faces toward the room's center, with the seat aligned to the keyboard.
Step 6. Fill the left cabinet
Set the display cabinet and robot dog along the far-left wall, beside the desk. The blue-gray dog stands on the cabinet top with its bright cyan face pointing left.
Arrange the visible controller, books, and colorful containers inside the cabinet's front compartments. Keep the blue drawers at the base and the orange side panel facing the room's outer-left edge.
Step 7. Arrange the robot and back-wall storage
Place the central robot and round stool in the open middle of the room. The white-and-blue robot faces the foreground, with its cyan ear pieces and purple chest visible. The small gray stool sits just behind its left side.
Set the golden bonsai yarn and books on the low storage unit beneath the wall display. The branching yellow bonsai fills the left half. Purple and yellow yarn balls sit in front of it, while the red container and upright books occupy the right end.
Step 8. Fill the right workbench
Arrange the right workbench screens and laptop along the front-right side. The angled gray screen stands at the left end, with the open silver laptop immediately behind and to its right.
The microscope and articulated desk arm go farther right. The blue microscope sits near the bench's front edge; the larger gray arm curves over the rear section. The upright blue-gray device stands behind them beside the wall display.
Step 9. Furnish the lounge corner
Put the teal sofa and snack table across the front-left area. The sofa's back faces the viewer. The pale table between it and the robot holds a red carton of fries, a green drink, a white cup, and a small flowering plant.
Place the yellow seat cushion and blue slippers near the right bench. The yellow cushion rests in the teal chair behind the laptop area, and the slippers lie together beneath the desk. The small yellow-leaved potted tree stands outside the sofa's front-right corner.
Step 10. Connect the glowing outer pipes
Fit the large cyan pipes and purple couplings around the room's exposed edges. The lower pipe enters from the left, bends down beside the sofa, and follows the front floor edge.
The taller pipe rises along the far-right side, bends outward near the top, and passes through the large pale cylindrical sections. Keep these broad glowing tubes outside the work surfaces, distinct from the thin turquoise lines mounted on the back wall.
Final placement check
The robot dog stays on the left cabinet, the main robot stands in the center, and the microscope belongs on the right bench. The storage boxes go upstairs on the loft, while the bonsai and yarn sit below the giant wall display.